The first thing you will need to do is follow the below steps.
Tools > Setup > Display POL Setup > Mobile Jobs > Edit the job you would like to add a notification to by clicking the pencil Icon.
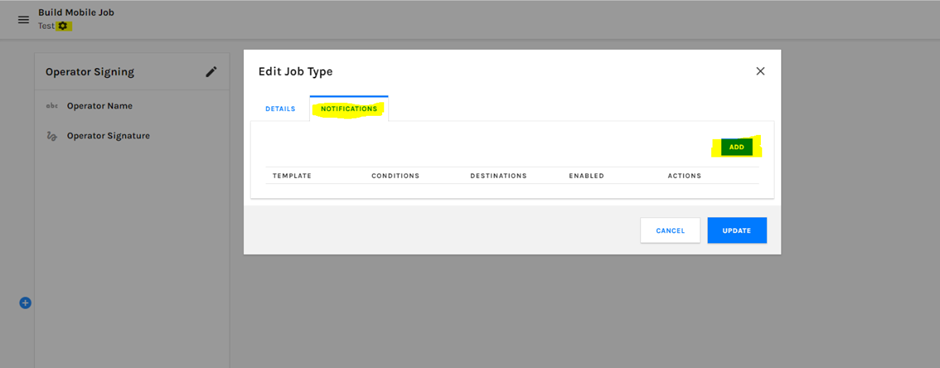
Once here you will need to click the cog symbol in the top left of the page.

You will now need to click on the notifications tab and then click add.
The first dropdown box controls what email template will be used.
The conditions dropdown box will determine when the notification is sent.
The destinations dropdown box will determine whom receives the notifications.
For both boxes I have selected when the job is assigned so the notification will be sent when the job has been assigned and the job assigned email template will be used.
Below is a list of what each condition and destination does.
Conditions:
- Job is assigned: this notification will be triggered when the job has been assigned to someone.
- Job is complete: this notification will be triggered when the job has been completed.
- New defects recorded: this notification will trigger when new damage and or defects have been recorded on the job. This could be issues with the inspectable items or with the frog diagrams.
- No defects recorded: this condition will trigger when no damaged or defects have been recorded.
- Job is at [Location]: this condition will trigger when the job has been completed at the selected site.
Destinations:
- Email address: the notification will be sent to an email address that you specify.
- User: the notification will be sent to the email address that is associated with an existing Prohire user.
- Role: the notification will be sent to each user under the selected user role for example Administrator or Manager.
- Role at job location: the notification will be sent to the selected role if it is also at the selected site.
- Job assignee: the notification will be sent to the customer that completed the job.
- Hire company: the notification will be sent to the email address against the hire company in Quick Setup > Company Details
- Customer: the notification will be sent the email address against the customer record on the booking.
- Job Signee: the notification will be sent to the person that signed the box and added their email on the job.
- Booking Contacts: the notification will be sent to the contacts that are recorded against the client record on the booking.
Once you are happy with your new notification simply click ok to save. It is also worth noting that you can add multiple conditions and destinations as part of one notification setup.