To explain the capability of adding in new clients of various types and to guide through how one might achieve this within their Prohire system.
Purpose
To enable you to perform such functionalities including but not limited to, assigning a client to a booking, sending out manual and / or automated emails, receiving payments, sending payments and more.
Procedure
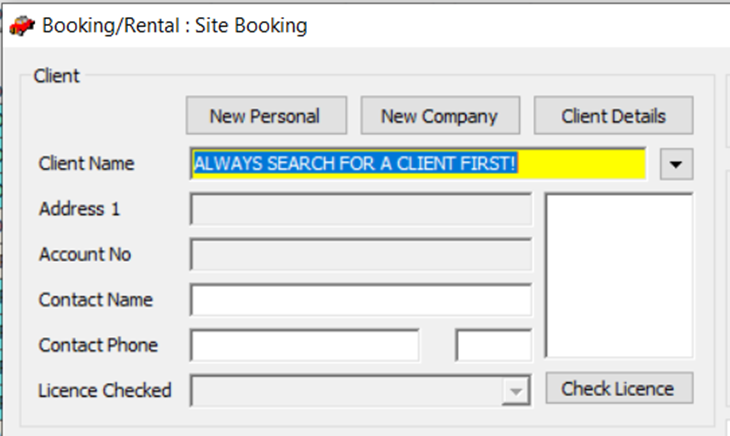
After drawing a booking you will be shown the booking screen, which in the top left of that screen has the client selection. There are two different new client options from here which as seen below are ‘New Personal’ and ‘New Company’.

New Personal: If you receive a booking or booking request through from an individual that has not hired from you in the past then this button will allow you the capability to create a new Private Client.
New Company: If you receive a booking or booking request through from a company that has not hired from you in the past then this button will allow you the capability to create a new Company Client.
Client Details: If you are in the situation that you would like to view the current standing information on the client, then ensure you have searched for the client using the search functionality in the yellow bar (search their name and hit enter and select them from the list) and then this button brings up the full client record allowing you to see all the information about that particular client.
Client Name: Shows the name of the client renting the vehicle.
Address 1: Shows the first line of the customer’s address.
Account No.: In the case that the customer is an account customer, their account number will be displayed in this box.
Bad Risk: If the client has been marked previously as a Bad Risk client for whatever reason, by clicking on this button it will allow you to view their Bad Risk record and remove and / or edit it if required.
Photo not present / Photo present: With private clients it is possible to take a photo of the customer and upload it to your Prohire system to make them more easily identifiable rather than just by name. If the client has a photo, clicking this will allow you to see their picture.
Contact Name: This field will show you the main contact for a company client that you have assigned to the booking. However this is an editable text box so you can enter a different contact person for this booking if you find it necessary.
Contact Phone: This field will show you the main telephone number for contacting this client. As with the Contact Name field you can enter a different phone number if appropriate.
Licence Checked: This field allows you to record when the customer’s driving licence was checked by your front desk staff and it will also record who checked the licence for auditing purposes.
Next to the client’s name field there is a drop down menu that brings up a number of options.

View Client Details: Selecting this option allows you to view all the details about your chosen client.
Search For Client: Typing a few characters into the client name field and selecting this option will search Prohire for all clients that match the characters you’ve typed in. The quickest way to search for a client is to type a few characters and it ENTER. This automatically brings up all the clients that match the characters. If you don’t know the full spelling of a client’s name the “*” key acts as a wildcard.
Search By…: This option allows you to search for customers details using other means other than the company name or client’s surname. Once you have entered the client’s account number, or licence number you can use this option to then search by them. Clicking on either Search For Client or pressing the ENTER key will bring up the Client Selection window. This will show you a list of all the clients that match the characters you entered, if you find the required client either double click on them or click Select & Close. From this screen it is also possible to create New Private and Company clients if you do not find the client you are looking for.
