Setting up a Client to use Consolidated Invoicing
Setting up Consolidated Invoicing is done on a client by client basis and cannot be enabled for only a particular rental. In this section we will have a look at how you setup a client to use consolidated invoicing.
1. From the front screen of Prohire, click Clients and then search for the client you want to setup with Consolidated Invoicing.2. Once you have found your customer and highlighted them, double click to view their details. Now on the right hand side click on the tab Consolidated Invoicing.
3. On the Consolidated Invoicing tab, put a tick in Enabled check box.
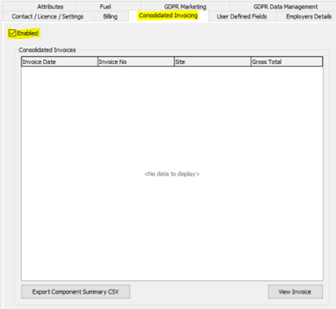
Now that you have enabled Consolidated Invoicing for your client, all rental invoices that get created for this customer will become Component Invoices. Component Invoices are just normal invoices that will become part of a Consolidated Invoices, so you are not able to print them or generate an invoice number for them.
You would have noticed within the Consolidated Invoicing tab of the client that it will also list all the Consolidated Invoices that have been generated for them allowing you to view and print if required.
Generating a Consolidated Invoice
1. The creation of Consolidated Invoices is done within a single screen, to find this go to:
-
- Invoices > Consolidated Invoicing.
- Invoices > Consolidated Invoicing.
4. This will then take you into the Consolidated Invoice Detail screen. At the top is the Invoice Date field, enter in the invoice date you want to appear on the invoice.
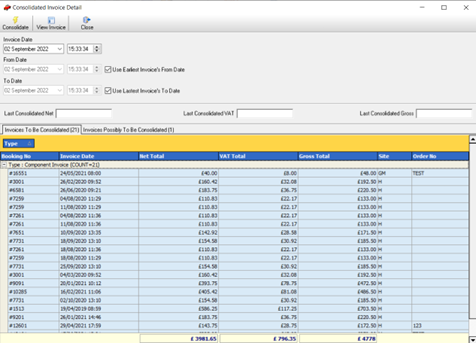
6. After you have selected the invoices you want to consolidate and check the Invoice Date to be used is correct, click Consolidate on the top left corner.
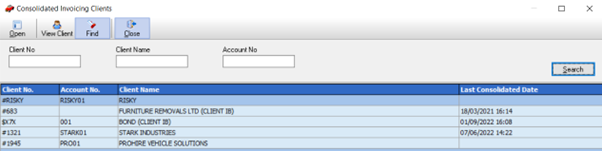
7. A message will then appear informing you that a Consolidated Invoice has successfully been created for this client and you will be taken back to the Consolidated Invoicing Clients screen.
8. If you wanted to then print this invoice you will either need to go into the Client Details screen, or search for the invoice under Invoices > List Invoices.
Additional Configuration Settings
Generally consolidated invoicing in Prohire is a single setting within the client screen that you enable when required. However within System Setup there is a couple of extra settings that you can enable that will have a global effect on the system, which we’ll cover in this section.
1. To find these settings, go to the front screen of Prohire navigate to the below:-
- Tools > Setup > System Setup > R.A. & Invoices.
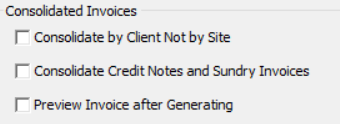
b. Consolidate Credit Notes and Sundry Invoices: with this setting enabled the user will have the ability to select these invoice types when creating the customer’s consolidated invoice. With this setting disabled the user will only be given the option to select sales invoices for consolidating.
c. Preview Invoice after Generating: this setting when enabled will present a preview of the invoice once it’s been created. Without this setting enabled you will need to go into the Invoice List screen when you have finished generating your invoices in order to print them off.