The screen below is used for setting up the Posting Configuration for Sage 50. Setting this up allows you to post invoices over to Sage 50 with the click of a button, and there are some advanced options that can be controlled in this setup screen.
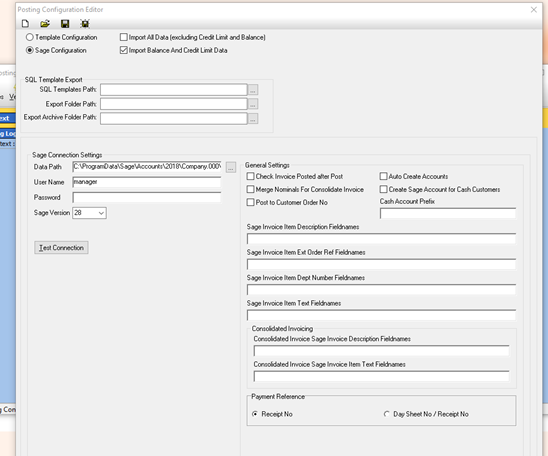
Below are definitions and explanations on what each setting does under the “Generic Settings” section on the right hand side.
Check Invoice Posted after Post – This option does a background check to see if the invoice has actually been posted. If Prohire gets the message 'already posted' then it knows Sage has received the invoice(s) successfully.
Merge Nominals for Consolidated Invoice - If you are going to be generating Consolidate Invoices and you prefer that each component invoice is merged, then tick this option. If this option is left unticked, then each component invoice will appear as a separate line on the invoice.
Post to Customer Order No - When an invoice has been given an order number in Prohire, this order will by default be posted to the ‘Order Number’ field in Sage. When the “Post to Customer Order No” option has been enabled, it will instead use the ‘Customer Order No’ field in Sage.
Auto Create Accounts – This checks to see when posting the invoice if the account exists. If it does not, then you get the normal error cannot post the invoice. If this is ticked Prohire will create the account in sage automatically and then try to post the invoice again.
Create Sage Accounts for Cash Customers – Cash customer invoices usually get posted into a cash account for example “CASH001” however if this option is ticked, account numbers will be given for cash customers.
- If you enable this setting, you also need to enable ‘Auto Create Accounts’. Otherwise you will get a ‘Customer not found in Sage’ Error when trying to post.
Cash Account Prefix – A prefix can be set for cash accounts which is linked to the option above. It is advised that a short prefix is given and typically in letters. We recommend a prefix of Z so that when Prohire is creating these account numbers, they are at the bottom of the list in sage.
The section below the tick boxes are where you can optionally choose if you wish for more information to be posted across with the Invoice. For example, we do not usually post Booking No, or Rental No. These can be entered into the 6 boxes below is this is required: -
Each field represents a different field in Sage, where the custom information will end up. For example, in the top box “Sage Invoice Item Description Fieldnames” – the custom data such as Booking No, will appear in the Item Description itself so will appear as the following in Sage (#123456, Rental 7 x Days @ 20.00)
Please reach out to the helpdesk (helpdesk@prohire.co.uk) if you require assistance with the custom field names, and for information on what else can be posted across with the Invoice.