From the front screen of Prohire select Tools > Setup > System Setup.

Once the Setup screen appears select the “Client” tab. This section is used to define several settings and is also the place where Client Attachment Types can be created.
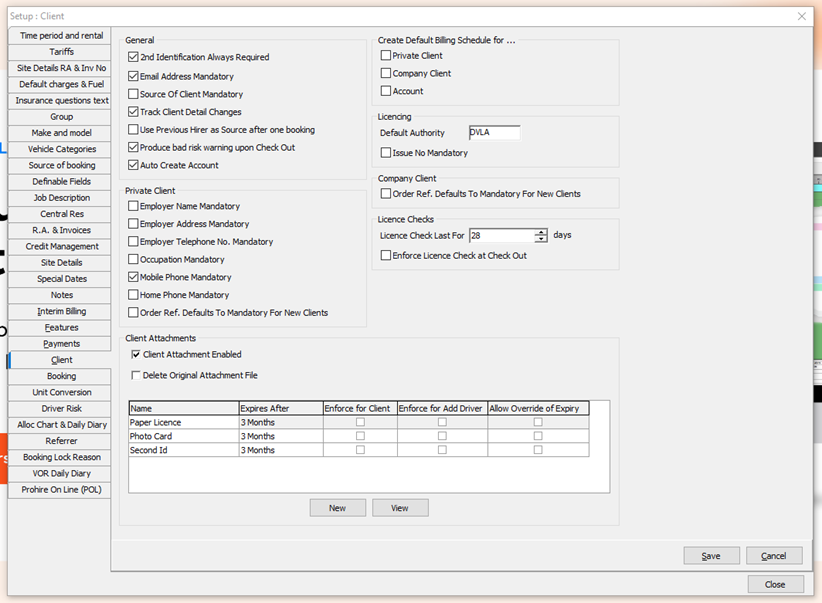
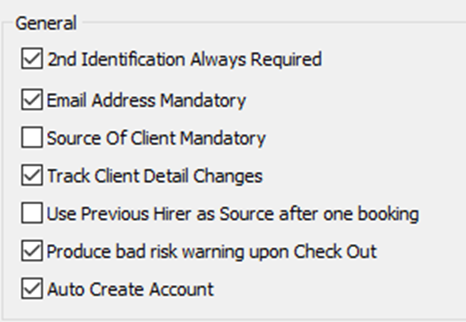
“General” Section
There are numerous tick boxes within this section, please see below definitions of each option and what each one does: -
- 2nd Identification Always Required – This setting is on by default and forms part of the checkout process. 2nd Identification is where the system will prompt for a further piece of identification, such as a Bank Statement, Utility Bill or Passport.
- Email Address Mandatory – This setting, if ticked, ensures that the Email Address field stored within Client Details is mandatory. You will not be able to save a Client Record unless this field is populated.
- Source Of Client Mandatory – The Source of Client is a dropdown box within the Client Details screen that allows you to select how the customer heard about the hire company. This setting, if ticked, will make this dropdown box mandatory.
- Track Client Detail Changes – This setting, if enabled, will track any changes within the Client Details screen, and can be handy if you’re wondering who changed a certain piece of data.
- Use Previous Hirer as Source After One Booking – This option, if enabled will set the “Source of Client” to ‘Previous Hirer’ after one Booking. If left unticked, the Source will stay as whatever you have set here previously.
- Produce Bad Risk Warning Upon Checkout – If enabled, the system will automatically warn you of any bad risk about the customer during Checkout.
- Auto Create Account – Auto creates an Account when creating a new Client record.
“Private Client” Section
- Employer Name Mandatory – Within the Client Details screen, there is an “Employers Details” tab. With this setting enabled, the “Name” field will become mandatory.
- Employer Address Mandatory - Within the Client Details screen, there is an “Employers Details” tab. With this setting enabled, the “Address 1”, “Town” and “Postcode” fields will become mandatory.
- Employer Telephone No. Mandatory - Within the Client Details screen, there is an “Employers Details” tab. With this setting enabled, the “Tel. No.” field will become mandatory.
- Occupation Mandatory – If this setting is enabled, the “Occupation” field will become mandatory and must be populated.
- Mobile Phone Mandatory – If this setting is enabled, the “Mobile” field will become mandatory and must be populated.
- Home Phone Mandatory – If this setting is enabled, the “Home Tel. No.” field will become mandatory and must be populated.
- Order Ref. Defaults to Mandatory for New Clients – When this setting is enabled, the “Order Ref Mandatory” tick box within Client Details is enabled by default. This will mean an Order Ref will be required for all your new Private Clients unless manually turned off.

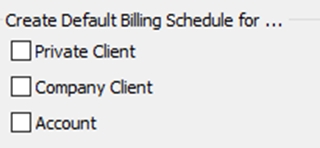
“Create Default Billing Schedule For” Section
- Private Client – If enabled, the Default Billing Schedule set within the ‘Interim Billing’ tab will apply to new Private Clients.
- Company Client – If enabled, the Default Billing Schedule set within the ‘Interim Billing’ tab will apply to new Company Clients.
- Account – If enabled, the Default Billing Schedule set within the ‘Interim Billing’ tab will apply to new Account Customers.
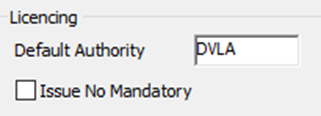
“Licencing” Section
- Default Authority – This allows you to set the default licencing authority such as DVLA or any other licencing authority.
- Issue No. Mandatory – If this setting is enabled, the Issue No. of the licence will be required.
“Company Client” Section
- Order Ref Defaults to Mandatory for New Clients – When this setting is enabled, the “Order Ref Mandatory” tick box within Client Details is enabled by default. This will mean an Order Ref will be required for all your new Company Clients unless manually turned off.

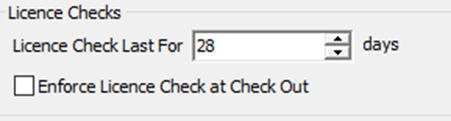
“Licence Checks” Section
- Licence Checks Last For – This field allows you to set how long a licence check lasts for before having to re-do one in the system. The default is set to 28 days.
- Enforce Licence Check at Checkout – This setting, if enabled will require the user to complete a licence check during the checkout, only if it has not already been done within the specified period above, in the “Licence Checks Last For” setting.
“Client Attachments” Section
- Client Attachment Enabled – If this option is ticked, an “Attachments” tab will be enabled within the Client Details screen, allowing you to upload or scan attachments directly against the Client record.
- Delete Original Attachment File – This setting, if enabled, allows the user to delete an original attachment file. If the option is switched off, original attachments cannot be removed.
Further Client Attachment Types can be added to the grid below, by clicking on New. You can have as many Attachment Types as you need and they can be used for any purpose. For each Attachment Type, you can set an “Expiry Period”, and whether you want to make it mandatory for Clients and/or Additional Drivers, and whether to allow an override of the expiry date.
